
As a user of the largest Operating System ever sold in man-kind history, I will never be a problem-free user. There are always things those keep on surprising me daily. One of it is the virus.
I could understand that virus will effect the huge user of this operating system. Because following the nature-law that people will put their attention on a big issues. Well, if you attack a low-user OS, you will get a few attention only. But imagine if you are successfully 'ruin' or 'damaging' a huge system. Then many people will get panic, and you'll get what you're aiming for.
Most of the late attacks to our PCs are coming from the bad-defense of our own. The easiest way is : we always assume that we live a healthy life, so our PC will never get infected - in this case, we don't install any anti viruses. Another false-thought of most of us is : we install anti virus once - so we thought we'll be invincible, we're virus free - so that we forgot to update its viruses database.
Even, after we install (and keep update) an anti virus software, still we're not 100% problem free. Since, it's well known that the viruses are always be one step ahead than the curer.
So?
Well, most of the anti virus will try to put themself into a hidden-hard-to-find folder, and then execute itself when the system is turned on. So, according to this description, there should be a trigger that will run them. In this case, the trigger is commonly placed at our system registry.
And defensing our system thru our registry is the best self-defence ever. Of course, we will have to be aware by any other kind of attack. But still, this will reduce the infection possibilities to almost 90%!
One of the software for defensing our System Registry is Deep Freeze software. By running this software, we could kind of lock the system, so that no one will ever be able to get in (unless we permit them).
I've been using this software for my clients, and so far, there are no problems (at least, that's what I know, hahahaha).
Happy downloading!
DeepFreeze.rar (1.87 MB)
Rabu, 26 Desember 2007
Kamis, 20 Desember 2007
Indosat IM2 Blitz - Broadband Internet Via Satelite
Good news for people who is in demand of good internet connection. After several moments being served exclusively by Speedy (I mean, the cheap but fast internet access). Now we have other option to choose.
Honestly speedy is well-known for its speed. Not only its fastness, sometimes (or many times), it's very famous by its turtle-speed access. And more over, sometimes Speedy (with no reason) is down with nothing we can do about it.
Once when my Speedy access is down, I tried to call the Customer Service; with a warm words they asked me about my speedy number. And then, nicely, they said, "Let us check the problem first to make sure about what is going on at your place". I was so happy back then.
But then, after she hung-up the phone. I realize. Hey, why they didn't ask for my name, my contact number, or else? Then how would I know the progress of their repairment ? Dooh! One thing left in my head is a good-thought, I believe they already know my name, my contact, or anything thru my speedy customer number.

IM2 Satelite Dish (Sorry, my thumb's showed in the picture :p )
And I was wrong. They never update about the troubles. So they left me disconnected for several hours, several days. And few days later after the connection is finally back to live, I visit the telkom website, I was trying to complaint about their service thru their website. I can't wait to see their excuses. Hours of waiting, days of waiting, even until months of waiting; finally they responds for my complaint. Well, it's too late, I even forgot about the problem! Hahaha.Well, for a poor user like me who could only afford a cheap connection; the speed like a flash will be just in our imagination (I thought).
Back to Indosat.
They offer me a satelite connection (KU-Band) for my ofice. The monthly cost is quite cheap, only IDR 800,000 per month (if I bought the dish - the price is around IDR 20,000,000), or pay IDR 1,700,000 per month (if I only want to rent the dish). Well, it's quite affordable.
On that amount of money, they give me the connection up-to 512 Kbps. With 4 IP Address (1 Effective IP - others are used by the satelite router).
Well, why not.
So, I installed this dish at my office. And I found that this connection is quite good. They never been down for 2 months (until now). But of course there are some difference between speedy and Indosat Blitz.
For speedy, their ping response is very fast some times could reach the DNS below 20 ms, but for Blitz, it needs at least 400-500ms. This kind of delay will be a problem for a user who use their internet connection for VOIP (Internet Telephony); it may cause a delay in the conversation. And also this long ping-reply will also cause a delay on accessing a website those have several hops until reaching them. So, when you do browsing; you will find a bit slower than speedy (if this speedy is running normally)
And then, what is the good point of using this IM2 Blitz? First, they're not easily disconnected. They only be a bit slower when there are a bad weather (a very bad one); but this kind of things are very rare; especially in Surabaya. Second, even though their ping-reply is much slower than speedy, but it doesn't effect the downloading speed. Using speedy, I could only reach around 30 KB/s, but with IM2 Blitz, I could get around 50-60 KB/s. Quite amazing! Third, there are no place limitation, no matter where you are (as long as you can reach Palapa Satelite), you will be able to be served by this Blitz.
After several months using IM2 Blitz; I think, it's not that bad to use a satelite connection anyway (of course until there are any other cheap-but-fast connection available - again, hahaha).

My Internet Statistic (21 Dec 2007), Green is for Download, Red is for Upload
Selasa, 18 Desember 2007
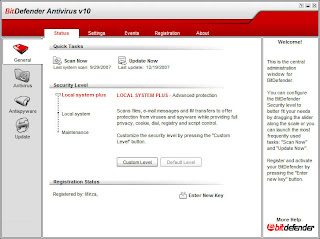
Review of BitDefender Anti Virus 10
Due to the rapid law-enforcement of copy rights in Indonesia; most of computer users are now struggling to keep alive in this computer era. Either you want it or not, we have to always keep up with current update with the latest technology. One of it is the anti virus software.
I have experience in using a former anti virus, I bought it legally for USD 35,- for each client, or Indonesian Rupiah (IDR), it's around IDR 325,500,-. Quite expensive for such a small company like mine; since we have to buy at least 40 copies of it. So, by a simple calculation, at that time I was USD 1,400 poorer for buying a one year license of that Anti Virus.
And few weeks ago, I was in the High Tech Mall (THR Surabaya), a mall that is specialized on computer (hardware and software) trading. Kind of surprise by seeing a very affordable anti virus, called Bit Defender Anti Virus 10.
What the hell is that? At that time, I don't know anything about this anti virus. All I know is that this anti virus is very cheap. It's only around USD 5. So, due to my limited time to either continuing my last anti virus license or purchasing a new one, I decided to buy a single copy of this anti virus.
After I ask the sales-person, I'm very happy to know that this Anti Virus is already support Windows Vista (I really need to remove my Windows Defender at that time - since it's kind of ugly defense anyway :p )
So, after using it for several weeks, here are some comments from me :
Good things about this software :
1. This anti virus is great for defensing our PC, since it could update its own database several times in a day
2. Good compatibility for Windows Vista Users
3. Easy to Install
4. Have an easy to watch monitor - for reviewing access in our PCs
Bad things about this software :
1. It ate quite a big resources when it does some background scanning. We could notice that our computer suddenly run very slow for no reason (and I find this out when I check thru my Task Manager)
2. Sometimes, it crash for no reason when finishing its auto updates
3. It has some background services - those of course it took our physical memory away
So, over-all result : this is a five stars (*****) for a five-bucks AV Software. Don't compare to other expensive software, please. :P
Delphi Programming - Aero Glass Effect
For Windows Vista Users (unfortunately, I'm one of them), Aero Theme might be the best among other theme. Why? It's just look so nice in our desktop. The glassy-looks behind the form header is quite relaxing.


Need a component that has ability to do so? Well, I do have one. After browsing in my favorite web site, torry.net, I found this component is quite good.
Here are the samples of the resulted pictures.
Do you want a copy of this component? Just click here : aeroglass.zip (113KB)
Communication With GSM Modem
If you ever need an article about how to communicate with a GSM Modem, this might be the best article you'll ever had. Why? Because it contains details about how to make a communication with a cell-phone or any other GSM Devices who acts as a GSM Modem.
This article is suitable for a people who wants to write an automatic SMS Gateway, such as auto pulse-refill counter, etc.
Just download this file, if you have anything in mind, don't hesitate to ask me.
atcommandgsm.rar (983 KB)
This article is suitable for a people who wants to write an automatic SMS Gateway, such as auto pulse-refill counter, etc.
Just download this file, if you have anything in mind, don't hesitate to ask me.
atcommandgsm.rar (983 KB)
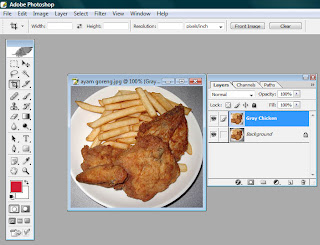
Partially Colored Images
Do you ever watch KFC's advertising on its place? And ad that shows only color on the fried-chicken handed by several people (which the other objects are in greyscale).

as you can see in the image above. The image is in full-colour. And our target is, how to turn other object, except the chicken, into a greyscale; so in advertising words : we trying to put people attention on the chicken image.
and the next step is, taking off all colour attributes on the copied layer (grey chicken) using Desaturate Function, under the menu : Image -> Adjustment -> Desaturate
And then, choose the masked layer. Select the brush, and choose the black colour. And then, start brushing on the chicken surface to start revealing the original coloured chicken in the background.
Do this brushing thru all over chicken part, until all chicken parts are perfectly coloured.
6. Final Image
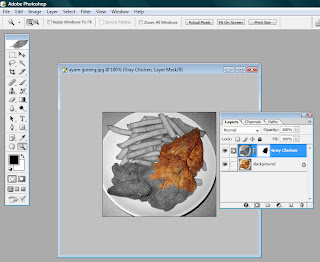
If you're wondering how to create that kind of image; well it's simple. Instead of using a selection to copy coloured chicken into a greyscale image, here's another way. Because by using a copy method over a selection, you'll find that the copy will be too rough-cutted (just like cutted by a scissor).
So, follow these steps below.
1. Original Image
as you can see in the image above. The image is in full-colour. And our target is, how to turn other object, except the chicken, into a greyscale; so in advertising words : we trying to put people attention on the chicken image.
2. Duplicating Background / Original Image
At first, you must duplicate the layer, and named it under : 'Grey Chicken'
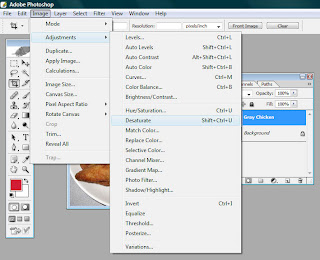
3. Desaturating Copied Layer
and the next step is, taking off all colour attributes on the copied layer (grey chicken) using Desaturate Function, under the menu : Image -> Adjustment -> Desaturate
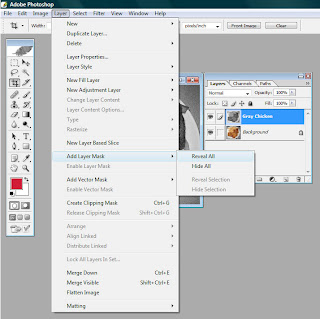
4. Adding Layer Mask
Create a layer mask (with Reveal All method) on the layer named 'Grey Chicken', under the menu : Layer -> Add Layer Mask -> Reveal All
5. Revealing Background Layer
And then, choose the masked layer. Select the brush, and choose the black colour. And then, start brushing on the chicken surface to start revealing the original coloured chicken in the background.
Do this brushing thru all over chicken part, until all chicken parts are perfectly coloured.
6. Final Image
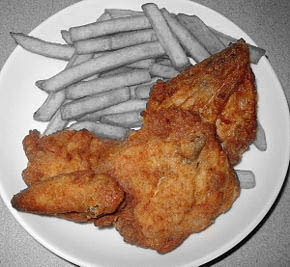
After you've done all those steps, you'll have the final image just like the above picture.
Simple, Right?
Minggu, 16 Desember 2007
Free PDF Writer
I have to admit that this one is the best FREE PDF WRITER available on the internet. This software is named CUTE PDF WRITER, and you can count on me for the quality of the output of this software.
Just install the two files inside this zip file, and then you'll have a new printer device, named : cutepdf.
So, if you want to create a PDF file, just open your file, and print the document using this printer (CutePDF), afterward, you'll be asked for a filename (the pdf output), and that's it! You'll have your pdf file!
pdfwriter.zip (6.6 MB)
Epson Printer Resetter
Do you have any EPSON C Series? If you do, I believe you have face this problem. The printer is keep blinking; can't print, and certainly become annoying error.
I have experience this once, at first, I don't know what to do - and then I brought it to the local service provider. Not more than ten minutes later, it's already fixed!
Damn! It's only a waste-tank problem. This printer should be at least once a year should be brought to EPSON Service Provider and "being repaired" there.
What they've done in the "Service" point? They only reset the ROM, and mark the waste tank to be empty! And that charge me money for seconds of working time.
So, don't get fooled as I did. Just download this file, and be your own "Service Man". :P
SSCServe.RAR (938 KB)
This file is compressed with WinRAR, so you need this software to un-compressed it.
Retouching Figures With Photoshop
Sometimes we're wondering how to transform an ordinary snap-shot pictures (taken with a cheap digital camera) to a photo-studio quality's image.
Oftenly we get amazed by the quality of the picture we received, where there are no more rinkles in our face, our skin look so smooth, our eyes look so bright - definitely look a like : us in the past ten years. Hahaha.
Well, you should worry no more. Here are some easy steps to do that transformation - using Adobe Photoshop CS 8.0.
1. Original Picture
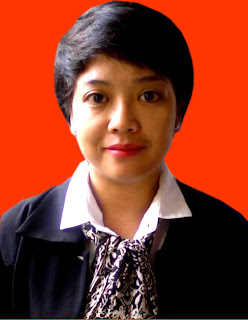
Above picture is the original one. In the image above, you can see some rinkles under the eyes, and you can also see the quality of the picture is not good enough - so that you can see some noises on the skin.
At this first step, all you have to do is adjusting the brightness and the contrasts of the picture, so that all the part the you want to show is properly lighted.
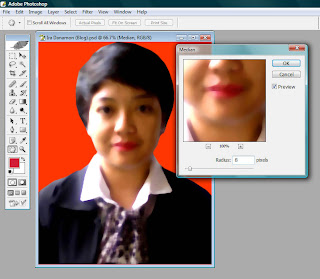
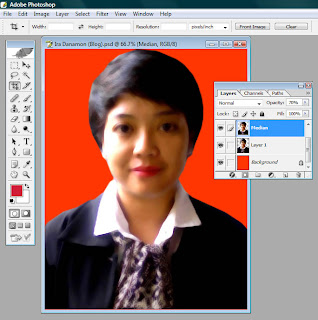
2. Duplicating Layer
After the first step is done, the next thing to do is duplicating current image into another Layer. Just name it : MEDIAN (or anything else as needed). After duplicating this image, you'll have two identical part of image, named : Background, and Median (if you didn't change the name).
3. Give a Median Filter

Oftenly we get amazed by the quality of the picture we received, where there are no more rinkles in our face, our skin look so smooth, our eyes look so bright - definitely look a like : us in the past ten years. Hahaha.
Well, you should worry no more. Here are some easy steps to do that transformation - using Adobe Photoshop CS 8.0.
1. Original Picture
Above picture is the original one. In the image above, you can see some rinkles under the eyes, and you can also see the quality of the picture is not good enough - so that you can see some noises on the skin.
At this first step, all you have to do is adjusting the brightness and the contrasts of the picture, so that all the part the you want to show is properly lighted.
2. Duplicating Layer
After the first step is done, the next thing to do is duplicating current image into another Layer. Just name it : MEDIAN (or anything else as needed). After duplicating this image, you'll have two identical part of image, named : Background, and Median (if you didn't change the name).
3. Give a Median Filter
And then choose the layer named 'Median' and do this following filter to the layer. The filter is under the menu Filter -> Noise -> Median.

The amount of pixel's distance of the picture is vary based on the quality of the original pictures. The smoother the original image, the less median's pixel distance is required. According to my experiences so far, the distance is around 8 until 15 pixels. Beyond that number, the picture will become too blurry, and we will lost the original skin's textures.
4. Reducing Median Layer Opacity
To maintain the original skin texture (so that the picture will still look like a human), we should reduce the opacity of the 'Median' layer. You can adjust the opacity level of your image based on the rinkles (or other noise) those appear in the skin. After you feel the rinkle has fade-away, you can stop the opacity of that layer on that level. In this case, Usually we choose between 50% until 75%.
5. Adding Layer Mask
Until this step, you'll find this image's skins are soft enough. But still, it doesn't look-like a good picture we want. It still look-like a blurred pictures. Then what should we do?
It's easy. Using the option Add Layer Mask, with sub-option : Reval All. The meaning of this function is to hide or reveal certain part of the layer and replace it with the background picture.
You can find this option under the menu : Layer -> Add Layer Mask -> Reveal All
6. Revealing Mask
After you choose to reveal a mask, in the Layer Window, there will be shown a mask box in the right side of current layer that about to be reveal. If you select the mask box, then you have two way to reveal a layer.
1. Use a black colour to totally reveal the layer (100%), or
2. Use a white colour to totally hide the layer (0%)
So it means, if you choose a gray colour for revealing a layer, photoshop will calculate the weight of the colour, and then will reveal the layer accordingly. For example : gray colour (absolute gray) will reveal 50% of the layer.

7. Points of Revealing
You might wonder, what is the part those should be revealed? Well it's easy, you should reveal the part that is allowed to be totally seen. In other word, you should only hide the skin, otherwise it should be opened. So basically, the things should be revealed is : eyes, lips, nose-holes, ears (using gray), hair, and the background (shirt, etc).
8. Finishing Retouch
After you done step 1 until step 7, you've finished the retouching process, and whoala! you can see the differences before and after retouching.
Opening Quote
Being travelled in a life-time journey in a computing world, makes me think about sharing all of my experiences, my thoughts, and all of other crazy things in side my mind.
18 years of travelling might not transform me into a super-inteligence human being in this computer world, but at least, that short roads have fully-filled my life with bugs, errors, and sometimes a little crazy yell like 'EUREKA!'
Please enjoy this web site, otherwise, you'll received a message called 'Bad Command or File Name!'
Hahaha.
Langganan:
Komentar (Atom)
