Sometimes we're wondering how to transform an ordinary snap-shot pictures (taken with a cheap digital camera) to a photo-studio quality's image.
Oftenly we get amazed by the quality of the picture we received, where there are no more rinkles in our face, our skin look so smooth, our eyes look so bright - definitely look a like : us in the past ten years. Hahaha.
Well, you should worry no more. Here are some easy steps to do that transformation - using Adobe Photoshop CS 8.0.
1. Original Picture
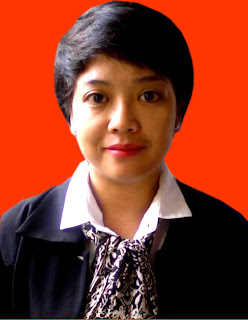
Above picture is the original one. In the image above, you can see some rinkles under the eyes, and you can also see the quality of the picture is not good enough - so that you can see some noises on the skin.
At this first step, all you have to do is adjusting the brightness and the contrasts of the picture, so that all the part the you want to show is properly lighted.
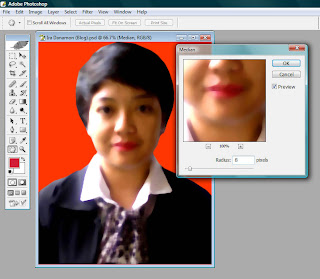
2. Duplicating LayerAfter the first step is done, the next thing to do is duplicating current image into another Layer. Just name it : MEDIAN (or anything else as needed). After duplicating this image, you'll have two identical part of image, named : Background, and Median (if you didn't change the name).
3. Give a Median FilterAnd then choose the layer named 'Median' and do this following filter to the layer. The filter is under the menu Filter -> Noise -> Median.

The amount of pixel's distance of the picture is vary based on the quality of the original pictures. The smoother the original image, the less median's pixel distance is required. According to my experiences so far, the distance is around 8 until 15 pixels. Beyond that number, the picture will become too blurry, and we will lost the original skin's textures.
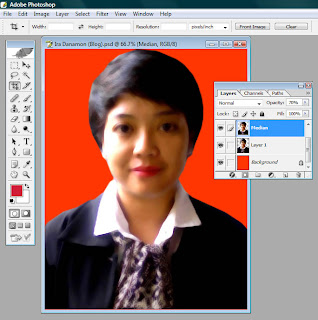
4. Reducing Median Layer Opacity
To maintain the original skin texture (so that the picture will still look like a human), we should reduce the opacity of the 'Median' layer. You can adjust the opacity level of your image based on the rinkles (or other noise) those appear in the skin. After you feel the rinkle has fade-away, you can stop the opacity of that layer on that level. In this case, Usually we choose between 50% until 75%.
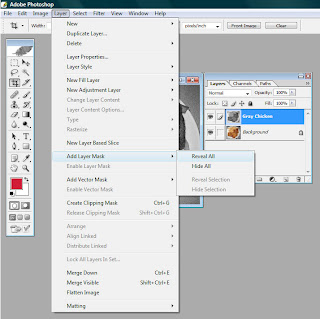
5. Adding Layer Mask
Until this step, you'll find this image's skins are soft enough. But still, it doesn't look-like a good picture we want. It still look-like a blurred pictures. Then what should we do?
It's easy. Using the option Add Layer Mask, with sub-option : Reval All. The meaning of this function is to hide or reveal certain part of the layer and replace it with the background picture.
You can find this option under the menu : Layer -> Add Layer Mask -> Reveal All
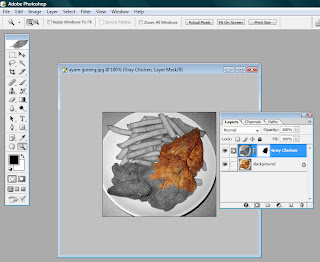
6. Revealing Mask
After you choose to reveal a mask, in the Layer Window, there will be shown a mask box in the right side of current layer that about to be reveal. If you select the mask box, then you have two way to reveal a layer.
1. Use a black colour to totally reveal the layer (100%), or
2. Use a white colour to totally hide the layer (0%)
So it means, if you choose a gray colour for revealing a layer, photoshop will calculate the weight of the colour, and then will reveal the layer accordingly. For example : gray colour (absolute gray) will reveal 50% of the layer.

7. Points of Revealing
You might wonder, what is the part those should be revealed? Well it's easy, you should reveal the part that is allowed to be totally seen. In other word, you should only hide the skin, otherwise it should be opened. So basically, the things should be revealed is : eyes, lips, nose-holes, ears (using gray), hair, and the background (shirt, etc).
8. Finishing Retouch
After you done step 1 until step 7, you've finished the retouching process, and whoala! you can see the differences before and after retouching.